 Hrvatski
Configuring HTS VPN Client on Windows without APP
HTS VPN is a versatile and powerful VPN solution that supports various operating systems, including Windows, macOS, Linux, and others. While there are numerous VPN applications available for Windows, some users may prefer to set up their VPN connections without relying on third-party software. In this article, we will guide you through the process of configuring a VPN client on Windows without using an app.
- Check for Built-in VPN Support
Before proceeding with the manual configuration, ensure that your Windows operating system supports built-in VPN functionality. Most modern Windows versions, such as Windows 10 and Windows 11, include this feature.
- Gather VPN Connection Details
To manually set up a VPN connection, you'll need specific information from your VPN provider. Gather the following details:
- VPN Server Address: The IP address or domain name of the VPN server you want to connect to.
- VPN Protocol: Common protocols are PPTP, L2TP/IPsec, SSTP, and IKEv2. Check with your VPN provider for the supported protocols.
- VPN Username and Password: The credentials provided by your VPN service to authenticate your connection.
- Pre-shared Key
- Access Network Settings
Go to the Windows Start menu and click on "Settings" (the gear icon). Alternatively, use the keyboard shortcut "Windows Key + I."
- Navigate to Network & Internet Settings
In the Windows Settings window, click on "Network & Internet."
- Add a VPN Connection
In the Network & Internet settings, select the "VPN" tab from the left-side menu. Then, click on "Add a VPN connection" on the right-side panel.
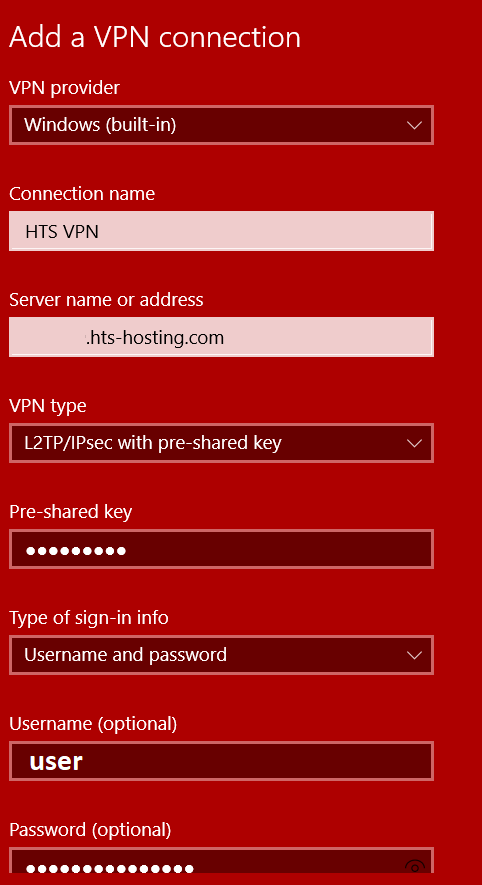
- Enter VPN Connection Details
Fill in the required information for the VPN connection:
- VPN Provider: Windows will default to "Windows (built-in)."
- Connection Name: Give your VPN connection a descriptive name for easy identification.
- Server name or address: Enter the VPN server address provided by us.
- VPN type: Choose the appropriate VPN protocol from the dropdown list, "L2TP/IPsec with pre-shared key".
- Type of sign-in info: Select "Username and password."
- Pre-shared key
- Username: Enter your VPN username@Virtual Hub Name.
- Password: Input your VPN password.
- Save and Connect
After entering all the necessary details, click on the "Save" button at the bottom of the window to save the VPN configuration.
- Connect to the VPN
To connect to the VPN, return to the "VPN" section in Network & Internet settings. Under "VPN," you should now see the connection you created. Click on it, and then click on the "Connect" button.
- Verify the VPN Connection
Once connected, you should see a "Connected" status. You can also verify your IP address to ensure that your traffic is routed through the VPN server.
Conclusion

Configuring a VPN client on Windows without using an app is a straightforward process that provides you with more control over your VPN connection. By following the steps outlined in this article, you can enjoy the benefits of a VPN without relying on third-party software. Remember to keep your VPN connection details safe and up-to-date for a smooth and secure online experience.
